Showing posts with label networking tweak. Show all posts

Sunday, 23 December 2012

PXE Server Manual

On 1/12/2012, I completed my project called PXE Server.

To create the server on the windows platform, i mean not windows server 2003 and 2008. just normal windows like xp, vista, and 7, u need the following file. i list down the file easier to understand what the importance of PXE Server.

the file;


  • GRLDR <------- grubdos linux version to boot by TFTP Protocol
  • menu.lst <------- after system boot the GRLDR, the system will search command in this menu. 
  • Bootable File <---- i choose the hiren_boot 10 .iso file.

The operation:
Get grldr file system inside the Bootland.


Creating the menu.lst
this part is hard to understand if you are beginner in linux and memory allocation. so better to watch and learn the code that made by other people rather than dive into these codes without knowledge.

example
below is the basic menu to run iso file. pls remember that u cant map directly .iso files, the file needs virtual memory allocation in RAM. just like the hirenboot iso.

title Hiren
map --mem (pd)/hirens.iso (0xff)
map --hook
root (0xff)
chainloader (0xff)


if you cant figure out this technique, pls inform me thru email to put more content about this in my blog.

My Email


Sunday, 26 August 2012

TV Mobili : Free Media Server For Windows , MAC and Linux

Media Server is the server to broadcast media content like music, movie, picture whether across the internet world wide or just in your local area network.

in old days, we used to built the entire PC including setting the network solution just for home media server let alone the OS itself. but now, with the technology called UPNP (Universal Plug N Play), you can setup media server in a minute.

today, i will instruct you on how you wanna do it.

Hardware Requirement :


  • Cable RJ45 (depend on your network architecture).
  • Router
  • An old Computer that wanna TV Mobili Server.
  • A laptop or computer to test the TVMobili Server.


Software Requirement: 


You need to install this software. Below are the instruction phased by phased using images.


After install this software make sure to take note tv mobili url!. This is important because you need to setup its broadcasting content. for example what folder, should or should not been broadcast to the local area network. 

Access to TVMobili

  • Open any browser. etc mozilla, chrome, safari, opera, firefox and ie.
  • Type in tv mobili url.

"In case if you dont find the TVMobili url, here i will provide for you. http://localhost:30888" 

Thats it. You have setup your own free media server based on UPNP network. This is the end of TV Mobili Setup Part. Next, we gonna review what inside the TVMobili Web apps can bring us.

Anyone who dont understand or have  questions please give a comment down below. thank you.

Thursday, 23 August 2012

Networking : What We Must Know

Network nowadays in essential in many aspects of business, social and educational. The Network is so called connection, between men, between machine nor computer. By creating a network, someone or something will be far more productive rather than single, standalone object. 

Today, we talked about computer network. Same as before, a connection between 2 or more object to achieve multiple objective. This "object" refers to computers. Computer alone can do many things but it is depends on how the user uses it. But by network, some aspect in computer a far more fascinating that those simple painting. 

Every thing needs a plan. there is no excluding in computer network. When there is plan, there is architecture.

Architecture


To create an architecture of computer network, someone needs to calculate several things before move the environment to the desired architecture. 

First of all, Scalability issue. From time to time the company will expand and we need to add new nodes. The problem is reside in the hardware. How many port/patch panel/modular jack needed to complete this task?

"scalability is the ability of a system, network, or process, to handle a growing amount of work in a capable manner or its ability to be enlarged to accommodate that growth. - wikipedia"

Lets say, the company have 5 computer right now. But the business is expanding. They need to use accountant department and centralize server. If you only buy hardware that only support 5 computers. The company surely have a hard time in budgeting the company revenue. 

Why It Counts? 

Based on the number of nodes and analytically increment over years, the major problem about connection between nodes is Reliability of the network itself. Reliability here means the connection are stable and smooth.

Reliability is a protocol to ensure the network stable and ready to use to send data over the network. For example, data request when certain packet are drop or damage due to the transmission over the line. Other than that, it also describe as reduce down time network which is mean that the network never disconnect its own client to satisfy other priority. 

"Realibility of a network often been tested by data transmitting. the way their doing the test is to stress the network with high volume of data transmitting until it fail."

Work Load

When things became real demanding and real-time, the workload will become very important. The workload in network is how many concurrent connection made by end user to server. What the server serve to satisfying user needs? how big the data that being transmitted throughout the line? 

At the end, workload depends on how users utilize that network. if the network is use for p2p downloading, the traffic will be sky high because the line receive larger data volume simultaneously. If in the network have high users traffic, i mean u need to change several things to be automaton, for example a server. a server can serve up to 300 users in one SME company. 


Thats all for today. see ya. if any question, pls comment below. 


Tuesday, 31 July 2012

DIY : CCTV For Home (Part ONE)

Getting The Items Ready


Many people thinks that buying CCTV system is expensive and waste for only home environment. it is not true. from what i was thinking is, CCTV system is a must to prevent any crime on your property whether property theft, accident, and etc.

Today, i gonna tell you that under 200 bucks can get u CCTV system to your house. The item that we need is will be put in below list:

1. ANY IP camera. Come in 2 choices whether to used Wifi or Cable.
2. A SERVER. Can used old pc. the one which collecting dust around the corner. Must Have OS at least XP
3. ANY Router. the connection between server and IP camera. need to port forwarding the CCTV port.
4. ANY RJ45 Cable. Connection between Router to SERVER.
5. An Internet Connection. This one is OPTIONAL.

Overview

Camera

For this experiment, i choose Dlink DCS-920 IP Camera for home surveillance system. This camera come in 2 option whether to use Wifi or cable in a box. so its handy when to configure to Server or Router. This camera also have motion detection region or this system called Smart Recording. Smart Recording reduce your hard disk consumption because it only record when there are movements detect on the camera including shadows. To configure this thing is not very hard. Just it need to be configure using Cable first before you can use the Wifi. The pixel of this camera is up to 640 X 480 HQVGA which means the pixel are crystal clear in range 10m ~ 30m.

Router 

Probably you should buy router that come with Wifi Antenna. I said so because we need to design SmartHome Surveillance system. So less cable means more secure. Thief doesn't know where you put your server is, what cable should they cut. The hardest part for none-IT people in this is every router comes with different menu when come to port forwarding. for example, for Dlink DIR-600, the port forwarding fall under Advanced Menu. I personally don't know what other Router port forwarding categories is.

Server

Many people think if wanna server, u need to buy it. Why not you build one? Okay, take old pc that you don't use anymore. Clean it up. After cleaning it, please install at least Windows XP. Then, if you used Dlink IP Camera, they should provide you with CD Installation. Install the CD content and don't forget to configure IP for the camera and server at this server! many people done mistake that he/she thinks the CD is for camera's driver but it is not. The CD is Installation Program For The Server. After installing and configuring it, it become a server. This part is done.

Cable RJ45

Why we used cable? because the connection from pc to router need to be establish using LAN Cable or we called it RJ45. You also can convert the cable by installing the USB Wifi Dongle at server. its the same thing.
Just remember. Only Camera is using Wifi. because we need it to be secure.

Internet Connection

This is an optional where you can view your CCTV Live Streaming from internet to your house. If you want to do it, first you need to sign up at dyndns.com and register your server public IP. Then from there, you will need to setup your server to be able to play live streaming. I will explain in part 2 later.


So guys, are you with me? if you not understand any part of this section, please kindly inform me by leaving your comment or email me..

Part 2 in near future...

Tuesday, 24 July 2012

Build our own Data Center


Every technician dream that our home filled with bunch of techies stuff and that carry incredible, out of mind blowing task to entire home. such as Home PBX, Wireless bridge, or Broadcasting Movies from your home. but today, i will guide you to what is SAN and what relation between SAN and Data Center...

Data Center is a center that govern all telecommunication, network, security and even data storage in one single center. The meaning of center here is it can be clusters, merging together, stacking each other, multiple network monitoring.

NAS is Network Attached Storage. Its a independence device that have built in network card to be plugin directly to the router or switch at our home. it have webserver built in to manage its own IP address. so user can upload store the file remotely. difference between SAN and NAS is, in NAS, U NEED TO KNOW THE IP ADRESS OF THE DEVICE. Meanwhile, SAN, U NEED TO INSTALL INITIATOR IN ORDER TO MAKE IT NATIVE LOCAL HARD DRIVE IN YOUR COMPUTER.

SAN is Storage Attached Network that provide you storage for iSCSI (Internet Small Computer System Interface) in LAN (Local Area Network) environment networking. typically mean that others computer storage/hard disk/partition can be like native local storage inside your computer if its in the same network as yours computer even the partition/hard disk are at another server..

illustration are best way to describe this..

This is the physical topology how SAN being put in a network.
This is Logical Topology how SAN share its storage..


How to build your own SAN? let me teach you how....

SAN requirement is :

1) SAN server can used old computer. depend on the requirement of the system.
2) FreeNAS software <---- this is a good linux software for setup SAN.
3) Router that support GigaByte LAN
4) RJ 45 depending on how long/many connection in your house..
5) Internet Connectivity to youtube how to setup FreeNAS 8.

That's all..... easy installation....


we will discuss about this when i have demand to build a SAN...

references :
Data Center
SAN (Storage Area Network)


Monday, 23 July 2012

The Introduction Of telephony System

in my childhood, i always wondering what telephone is made of. Why i can talk as if the person is in front of me despite their house are 2 miles from mine. then time move on..

today, i stumble across unified communication, using telephony system(PBX), look alike telephony system(VoIP - IP PBX), and some other unified communication(collaboration between existed system.).

lets we dive into the telephone system. in this title, station are referring to telephone. 


PBX
stands for private branch exchange where its a device that routing your phone from single line into multiple line inside you office. but nowadays the use of PBX are obsolete  because emerging new system.

IP PBX
this PBX using intranet / ethernet networking peripheral to route your call from outside world into your office.   for example of this system you will see at your office are not normal phone, it has data port alongside analog port. common usage nowadays in small or bigger office. 

Trunk Line
trunk line is a line that you can use to call outside world (PSTN) or from outside world to reach you. if you use that line to call, another person who wanna call you will be diverted into voice mail just like your handset. 
usually your main phone number is the trunk line.

PSTN
stands for public switched telephone network. Its a device that routing your call based on what you are dialing. for example, if you press 911, the PSTN will automatically routed your call to the nearest hospital. 
its like a switch in internet/networking environment.


Thats are for newbie, but what's there for something more? setup your pbx? 

good, now u can talk to your gf next door 24/7 for free. 
to setup the PBX, u will need:

1) PBX SERVER (for analog phone, need to buy) or VoIP SERVER (For digital phones, used pc)
2) if you wanna used analog phone, pls read this. The server must have analog port to allow in coming call and out going call. u need to configure everything in the server USING PHONES!!. The most efficient method hardware to use for analog phone is LinkSys PAP2T. this hardware configure using computer. dont worry. but the disturbing part is it only have 2 analog port which means only 2 analog phone can be plug in that hardware.  

3) for VoIP server, its only used old pc to setup the server. because VoIP are using this special phone: SIP Phone. SIP Phone are not normal phone. they are computer that look like phones. The software for VoIP is Asterisk@Home, Trixbox..

The rest is yours to command. 


Monday, 9 July 2012

How to Setup WebServer using XAMPP part 2

ok, we done searching IP address and downloading the XAMPP software. now we proceed on how to Port Forward in router to allow incoming connection from the internet to you local webserver..

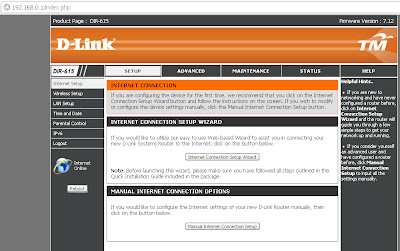
example being done in router D-Link DIR-615

1) open your browser. regardless firefox, chrome or safari. and type default gateway number. for example 192.168.1.1 and then press enter. it should be like below.


2) type in the username and password in the box to proceed. please remember that, if you dont know what type o f your router, you can check at their box. the router box have instruction and manual configuration including default username and password for your router. if you done key in the required box, it should be like this.


3) please select Advanced tab. and you will see the port forwarding box. please enter the IP adress that you copy in the previous post. it should be like this


port 80 is the port we use the web browser to navigate internet. thats why we need to port forward the port. 

4) fill in the blank box with your ip and port. and then click save at the bottom of the page. and last part, we need to install the XAMPP..

5) install XAMPP, leave all option default. click next to the end of installation and it should be like this.


6) click start Apache and start MySql. it should appear green box with "running" written on it. just like below.


7) and you are done! you can use your local pc/ laptop to host website or system regardless internet or intranet.

for the internet connection you need to read dyndns.com manual. blieve me. it worked.

How to Setup WebServer using XAMPP

Hi, today i will show you how to setup your own webserver. i dont want to talk too much because my motto is straight to the point.

1. The first step is to download XAMPP software. you can download it >>[here]<< . if done downloading it, please proceed to the next step.

2. install the XAMPP. if you dont know how to setup XAMPP, please refer to my previous post on how to setup own private cloud. after install the software, running the apache and mysql within the xampp software.

3. port forward your router. down below have an example provide from me to you...from how to know what your ip addres to port forward your own router.

Scan your IP Address

first of all, scan ur ip address. How?

windows xp
1. hold down windows logo button and press R button. it will pop up a window. 
2. type in this window "cmd" without bracket and press enter.


3. it will pop up a black window screen just like below.....


4. type ipconfig and press enter.
5. search for "Local Area Network" connection. it should be like this, if home user : 192.168.xxx.xxx. for example....


6. done. you got your own router ip address. router ip address is by the name default gateway.

ok, we proceed to part 2


Saturday, 21 January 2012

How to request google map using coordinate

Getting tired of searching something on Google map? so here are the solution:


  1. using Google maps starred icon. zoom your desired location until you see star icon and click it.
  2. using method url overriding. for example :  javascript:void(prompt('',gApplication.getMap().getCenter()));
  3. Using my kind of method : copy code below and past at url. change the latitude and longitude first.

 http://maps.google.com.my/maps/place?q=<put your coordinate here, must be pair, saparate by comma, ignore the "<" and ">", ok?>

for example:

http://maps.google.com.my/maps/place?q=3.107094,101.608255

The tweak of the day, bye2,enjoy.

How to know latitude and longitude of the map

The paper with region drawing cant be called map without border. this same happening with digitalis maps.
Google maps are essential for user to know the the location name but for advance user, it will certainly need a code to do that.

im gonna show how to tackle google maps functionality on latitude and longitude. there are 3 methods to get latitude and longitude out of the maps.


first method is using override functionality using java script. below is the example to override the url browser.


» Click to show Spoiler - click again to hide... «


A little dialog box will pop up displaying the coordinates which can be copied and pasted for use elsewhere. This code can be bookmarked and then used in the future by selecting the bookmark.


second method is using google maps itself. open google maps, and track where you are. 


Right click here you wanna know the coordinates on the maps. you will see something similar like above picture. then click what's new.


and thats you coordinates in the google search box. i hope your enjoy exploiting new 'toys' here.


last method that im developing is this small system. click here to proceed. <----its not an ad.trust me.


Sunday, 25 December 2011

How to rip Dynamic Flash Template

What you need:


  • Sample dynamic flash template from TM website
  • Sothink SWF Decompiler
  • Macromedia Flash
  • Yourself


browse or search your favorite dynamic flash template in TM website. If you got one... click the "view" link and new window will open with dynamic flash.. loading...

If the movie fully loaded, click View -> Source in your browser to bring the source code of the current page and in the source code, search for "IFRAME" and you will see the iframe page. In this example were going to try the 7045 dynamic template.

get the URL (ex. http://images.templatemonster.com/screenshots/7000/7045.html) then paste it to your browser... easy eh? wait! don't be to excited... erase the .html and change it to swf then press enter then you'll see the flash movie again icon_smile.gif.

copy the URL and download that SWF file.. use your favorite download manager.. mine I used flashget icon_smile.gif NOTE: dont close the browser we may need that later on.

open your So think SWF decompiler... click "Quick Open" then browse where you download your SWF/movie file. Click Export FLA to export your SWF to FLA, in short, save it as FLA icon_smile.gif

Open your Macromedia Flash and open the saved FLA file. press Control+Enter or publish the file... then wallah! the output window will come up with "Error opening URL blah blah blah..." dont panic, that error will help you where to get the remaining files.

Copy the first error, example: "7045_main.html" then go back to your browser and replace the 7045.swf to 7045_main.html press enter and you'll see a lot of text... nonsense text icon_lol.gif that text are your contents...

NOTE: when you save the remaining files dont forget to save with underscore sign (_) in the front on the file without the TM item number (e.g. 7045) if it is html save it as "_main.html" and same with the image save it as "_works1.jpg" save them where you save the FLA and SWF files. Continue browsing the file inside Flash application so you can track the remaining files... do the same until you finish downloading all the remaining the files.

i credit this writing to its author: BAISAN

Friday, 16 December 2011

iphone 4 S! launch today

it amazing enough when we see some people can talk across globe for free. but what's more amazing is what people talk to machine and get the straight answer in human voice!!!!!

that is iPhone 4 Siri..... yes its the name applies.

i cant elaborate much but who like this pls share. we get to much closer to era where robot can understand human languages. hahahaha


How to create your own Cloud Computing

many of us keep wondering, how im gonna do the cloud computing without spending too much? i know that cloud computing are more easier to share file, documents, and many things regarding project development to event management but how im supposed to get that utilities?


so, here i am to tell them how....


in this new technology world we need less resources, less time to work, earn big reward....same as IT field. less config, data transmit, reduce time consuming, free from due date thing and work is done in second....


so lets talk about centralized all pc into 1 central location...server. in your mind, where the hell im going to get that cheap server, relax, it can be done in second if you read carefully.


so our objective:

  1. get the server
  2. get the server runing
  3. get the cloud computing installer
  4. get the necessary software running as background
  5. install that cloud...
  6. share the cloud...


1. get the server
OK, here is tricky part. you need to know how many pc in your local network. even SOHO(Small Office Home Office) need to configure this.
lets say you have 5~10 pc, so you only need CPU that running 2.5 megahertz and normal NIC(network interface card.


2. get the server running

So we started at small scale. pick up any old pc that have 2.4 mhz power. plug in pci NIC gigabyte. and we ready to go.
assume that U have install windows. if don't, I will teach you later. email or comment below.
note: this only running in windows version. others try google under name server cloud in Linux.


3. get the cloud computing installer
oh, this part need to listen carefully. you have to get software name xampp first. you can get it here.


4. get the necessary software running as background
after download, install that xampp. if you don't know how to install it, pls follow this tutorial.


after running xampp installer, follow this picture to guide you to running the web server platform on your server.


thick apache and mysql, then click start for both selection. you will see the green bar stated running


so, after that leave the xampp or hide it at task bar.


we need to get one more installation to complete the cloud computing. the core file itself. click here to download eyeOS.

after download....and then wat?
after download, extract the file into xampp/htdocs/eyeos/<your files>. if you dont have folder eyeos, pls make one for easier to find later.


how to access and setup your own cloud?
thats tricky questions, ok. i show you but in order to make sure you all have done the right thing, just open your browser and click this to test.


if you succeeded to see this picture below, you doing just fine.


5. install that cloudd!!
oh, ok...
first of all, we need to ready our own database. click here to open your own database. dont forget to bookmark it. it should be like picture below:


as you can see, please create new database called eyeos at Mysql localhost - create new database text field.


just enter the eyeos and click create. and you are done. you can close the tab also. by this line, we have ended the creating database for our own cloud. next will be installing the cloud.


i get you the link so you all dont have to type in all of it.


click here to setup eyeOS


you will see like this below. from this point, pls follow the picture provided.


scroll down and you will see like above picture.


by default the mysql password will leave blank. just input like about picture except eyeOS root password. that's you need to put your own password desired.


then enter your own username like root and <your own password> at the form provided.
if you entering the authentication right, you will see like this:


welll we are done here...


6. how to share? in LAN or wide? 
LAN first, ok, server must access like this = http://localhost/eyeos..


all other pc ?
like this : http://<pc-server-ip-or-name>/eyeos/


for example pc a name kay's_comp. its a server of eyeos.
so they write URL in the server browser like this: http://localhost/eyeos/


but pc b want to access pc a, they will write URL in pc b browser like this: http://kay's_comp/eyeos/


is that explanation clear?


Q & A? 
why cant I connect even I do step by step in this tutorial?


1. check if the installation procedure correct?
2. check whether the setting of eyeos are correct?
3. check database setting are correct?
4 . last, port forward your router to accept port 80. <--last resort.(anything else pls leave a comment).

Thursday, 15 December 2011

Cloud Computing - What is it?

overview

Cloud is a simplified operating system that runs just a web browser, providing access to a variety of web-based applications that allow the user to perform many simple tasks without booting a full-scale operating system. Because of its simplicity, Cloud can boot in just a few seconds. The operating system is designed for Netbooks, Mobile Internet Devices, and PCs that are mainly used to browse the Internet. From Cloud the user can quickly boot into the main OS, because Cloud continues booting the main OS in the background.

so meaning that, we don't have to reinstall normal operating system just to used web browser because statistic show that nowadays people use computer every hours just to go to internet....

we also don't worry about our computer being torn up by virus because we save also off our document on-line. we can pick, download, edit and save in real-time, anywhere and almost everywhere if we had internet on our side.


here are picture to clarify you about cloud computing:


as you can see, cloud computing almost cover up to date devices to ensure you can reach your own data at every places.


disadvantages:

  1. not all system used cloud computing, for example pc used for designing graphics or pc used for engineering purpose.
  2. limited file extension that can be save. for example, document, picture, music file and so on but not graphic builder extension, rendering process, engineering calculation that needs larger storage.


for more information, please visit:

Wireshark - network monitoring tool


When we talk about network, for non-it people they will think it only internet. Network have wide coverage from LAN( Local Area Network) to WAN( Wide Area Network) or so called internet nowadays. by network we can do many things, for example, sharing data, download data, chatting or face-booking. 

so today im gonna explain what this software have to do with networking whether its wireless or wired connection.
This software often used by network administrator to check whether they have multiple connection, single connection, incoming, outgoing data or traffic from the source to designated location.

for example, pc a want to transmit data to pc b but there is no way to check the data transmitted through router or bridge. So here comes Wireshark! it can monitor, tell, and configure and detected misconfiguration inside your network. 

furthermore, it most widely used to monitor larger scale network inside company. So it don't sweat over small networking though, don't worry.

so i don't have wireshark installed like hacker did. i just pointing the tutorial out for you guys.

document and video tutorial
download the software